I spent 5 months of lockdown restyling the front end of my survival bike, here's what i did.
4 posters
Page 1 of 1

I spent 5 months of lockdown restyling the front end of my survival bike, here's what i did.
![]() by Big Chris Sun Nov 01, 2020 7:09 pm
by Big Chris Sun Nov 01, 2020 7:09 pm
A few years ago I named my KLE500 survival bike “The Scream”, and have adopted the radioactive version of Munch’s famous painting of the same name as some form of badge or logo for it.
As standard it looked like this.

And for the last 2 years it has looked like this.


I’m happy with everything from the tank backwards, but I have been less happy with the headlight/clocks/front area. I didn’t like the looks, specifically that spar of the original fairing bracket which went from the area at the front of the tank, around the forks to the clocks. And the lights were shit at illuminating the road at night. I didn’t like the lines of the top section of cut-down mudguard. And I really didn’t like that big open air gap under the front portion of the tank.
So I took advantage of the lockdown to change it. I had used a pair of “Projecta” HID lights from Furore products on my Transalp in Australia before. They are really good at illuminating the road, they are small, and thus not too obtrusive. But they aren’t cheap, about £300 a pair. However, they are E-marked and they have a mechanical shutter which gives them a dip and a main beam, so both lights are both permanently on. This means you can flick from dip to main without the 2 second delay that comes from having 1 light as dip and the other as main. Having properly functioning lights when riding country roads at night makes such a difference to how much I enjoy the ride.
A problem I have is that the instruments were designed to be behind a screen, so they don’t have a front, which both looks ugly and the clocks seem exposed to the weather. Therefore I need to incorporate a cover for them. The alternative is replace with a mini digi speedo but that’s £100+ and I’d just shelled out on the lights, and I had a bad experience with a shit rev counter on a digi speedo in the past. Standard clocks work so much better.

And I also didn’t want to follow existing survival bike styles: Which means I didn’t want to do twin 2CV headlights (My survival KLR650 had them 2 decades ago), and I didn’t want to do “bike with a face”, so no gasmask or alien face streetfighter fairing either. I did think about using an aftermarket katana fairing, but ultimately I decided it put too much bulk at the front, so that idea was rejected.
Pre-covid, to do design I used to load a photo of the bike into MS paint, I’d white out the parts to be removed, take home several prints, sharpen my pencils, and draw differing design options. Except I’m not in the office any more, I don’t have access to a printer. So I had to mock up in 3D, using old cereal packets.
The first thing I did was remove the forks entirely, so that I could weld a 10mm thick lug onto the headstock. This meant I could do away with that ugly fairing panel spar that I mentioned earlier. There is now an uninterrupted view of the full length of the fork legs.
I moved onto thinking about the lights, and how to set them up. I tried various different styles of headlight layout/instruments front cover.
Most of them looked a lot like an Africa Twin or Paris Dakar style.


I wanted the bike to look like it had been built in some improvised workshop after the mythical apocalypse, I didn’t want it to look like a standard bike, I want it to look home-made. So I kept thinking about how to style it. I’d been given a huge box of bike spares when a relative did a garage clearout, in it were a pair of LED marker lights, and thus the idea of multiple pairs of small headlights was spawned.

Much mocking up later, and I had a layout for the lights I was happy with. When creating a custom bike I find the “design” part the hardest. Making it look “right” is the hardest part for me. I can make things work, but the home made styling parts I make are often ugly. It seems to take me several goes at making the costmetic parts before I settle on a design which looks cool.

I’m working in a double garage in a suburban house. I have a workbench, a vice, a mig welder and grinders. I don’t have lathe or milling machine, but some mate shave lathes, so I can get some small turning jobs done. Most measuring and cutting is by eye, and by hand. The consequence of that is that parts I make don’t always have straight cuts, parallel lines, or proper right angles. This is OK when building a post-apocalyptic survival bike which I want to look like it was cobbled together in makeshift conditions. However, if I wanted to build a nice custom bike with beautifully machined components I think I’d struggle.
I’ve discovered “weld nuts” being sold by fasteners suppliers. Basically they are an unplated mild steel nut, designed to be welded to things. Which speeds up the process of creating a female thread or captive nut in a bracket, making it easier to bolt a component on.
With the design finally decided, my next task was making the brackets to mount the 3 sets of lights in the place I had mocked them up.


And HIDs come with a ballast pack, about the size of a cigarette packet, and I have 2 of them, the only place where I had space to mount those was under the front of the fuel tank. So I cut a sheet of 3mm thick alloy to act as a combined heatsink and mounting plate, and welded up brackets to locate that assembly under the tank.


Soon after completing that task I discovered the wires supplied with the lights didn’t meet. The path of least resistance was to buy more weatherseal connectors and their special crimping pliers, so I could adapt the HID’s original wiring. Whilst mucking about in that area I installed some dual-function white & yellow LED arrays to be sidelights/indicators visible to the side. I figure that if the bike is matt black it is invisible, these days car drivers are dazzled by the lights of their phone in their car, so you need to be bright to be seen. I decided to cover the bike in lights, it’ll be illuminated whilst riding after dark, so nobody can say they didn’t see me. The joy of modern LEDs is that they can be intensely bright whilst also being quite discreet when they’re not in use. I have learned that cheap Chinese LED lights off ebay are sh!t, they are too dim in daylight. Pay good money for American ones and they work much better, visible in both day and night. They are probably also made in China to be fair, just made to a higher spec.
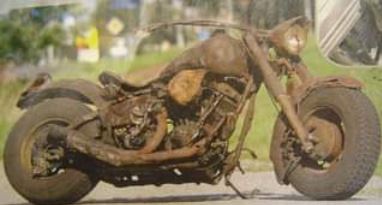
At the front there are 3 pairs of lights, the biggest ones at the bottom are the HIDs.

Above that “the medium pair” are LED running lights which came from the box of bits, there’s no manufacturer’s mark on them. That’s a pity, cos they are brilliant, nicely discreet but are big enough and bright enough to be seen from quite a distance, but I cannot tell you how to search for them online. The top set of LEDS are 9watt eagle eyes with roughly 11mm diameter lens. These are also bright as feck. They are on a 10x1mm thread (metric fine) which I found out the hard way when trying to make tubes for them to screw inside. Once the lights were on I then narrowed the instruments by sawing off some superfluous plastic from their outer edges.
All that remained was to make some bodywork to cover the lights. I used polycarbonate sheet, mostly 2mm or 3mm thick. I bought off ebay, luckily I had plenty leftover stocks from the days before covid started and screens were needed everywhere. Polycarbonate is great stuff to work with. I found that acrylic (aka Perspex) is very brittle and shatters easily. Polycarbonate is easy to work, it can drilled, filed, angleground, and requires only gentle heating to bend it. They make conservatory roofs from polycarbonate. And they make bus shelters from it. So when chav kids throw a breeze block at the bus stop, the polycarbonate flexes, the block bounces off, and there’s no shattering. The sidepanels and tailpiece on The Scream are all made of polycarbonate which has since been pained black.
More cardboard templates later and I had made the panels.


You can’t bend the same piece too many times so some complex shapes were made by gluing 2 pre-bent pieces together. There was lots of filing out screw holes to be egg shaped in order to make them fit, but that’s how it will be after the apocalypse, man….Polycarbonate takes paint nicely so a simple spray and they’re done. Aldi spraypaint is shit, too much solvent and too little pigment, Screwfix and Toolstation sell much better stuff.


A separate task was to make the infill panels which fill the gap in front of the fuel tank. I’d bought some sheets of perforated aluminium with the best hole pattern. Again cardboard templates were used. Where it was cut and folded, the perforated alloy had vicious sharp edges, so I covered them in chemical metal to smooth them off. I also bought the narrowest available vehicle trim to cover the outer edges. Then I copied the rolling stones and painted it black.

I binned the top section of the front mudguard, leaving the lower cut away back section of the original one. That was great until it rained and I got a facefull of spray. As an interim measure I now have a standard mudguard on until I figure out a cool looking post apoc mudguard that also keeps the spray off my face.
The bike was back on the road a few weeks before the date of the re-scheduled Farmyard party at the end of September, so I could have ridden it there, though we all know that event was also a victim of covid. All this took 5 months, which is way longer than I had expected it to. It took a long time because I was going through the corona-coaster, some days were a deep struggle and some were totally brilliant. All of us have struggled as a result of the virus or the lockdown, for me it was the enforced solitude, without human contact I went a bit loopy at times.
It’s now October 2020, I’ve been riding the bike as often as I can, and so far the frosts still haven’t hit. My other bike (a Tiger 1050) is great at high speed on open roads with fast sweeping bends, but I have to ride an hour or so to get to them. The Scream is smaller, lighter, narrower, flickable. It’s great on the tight and narrow roads near my home, its slim enough to carve up city traffic, so this bike is great for a quick blast for a short time in my local area. Its great therapy.
I’m much happier with how it looks now, except for the front mudguard. It’s just a standard mudguard. I need something which can keep spray off my face, but I’d also like it to look a bit more aggressive. At the back of the bike I have a sliding mudguard extension which slides from under the number plate and is part hidden in the tailpiece. I’d like to have something similar at the front, which can be cool and minimal on dry days and on show days, but can also function as a mudguard needs to in wet conditions. If anybody’s got any ideas please share them.
For me to get from Edinburgh to the R&S or Road to Ruin its 8 hours of motorway riding. A few years ago I made a quickly removable luggage rack to carry my camping kit. I also made a removable larger front screen, which cut out the wind noise by about half, thus making long hours on the motorway a lot more bearable. That screen now won’t fit, so I’d like to make another. The lesson I learned from the first one was to buy a screen rather than making it, and instead devote my efforts to design and building a system of mounting brackets so it can be quickly fitted and removed. I’ve bought an aftermarket screen for an Africa Twin from ebay. This screen is taller and blacker than standard and doesn’t look out of place on this bike. When doing this latest round of work on the front end I thought ahead, and included some captive nuts in the work I have recently done, so there are mounting points for the necessary bracketry.
Winter’s tasks will be the screen, and the front mudguard. Other than that, the bike is the way that I want it to look. At last.
These are the most recent photos I have, the only thing to have changed since these were taken is the addition of a standard front mudguard


I am thinking of cutting some holes or slots in the front fairing panel, to break up the large area at the front. However, I am considering fitting some form of hidden dashcam behind that screen, with just a discreet hole for the lens to see through. Apparently cameras deigned for drones are the smallest ones so maybe I can get one of them to fit, and give it a switched live power feed. Another winter task methinks….
As standard it looked like this.
And for the last 2 years it has looked like this.
I’m happy with everything from the tank backwards, but I have been less happy with the headlight/clocks/front area. I didn’t like the looks, specifically that spar of the original fairing bracket which went from the area at the front of the tank, around the forks to the clocks. And the lights were shit at illuminating the road at night. I didn’t like the lines of the top section of cut-down mudguard. And I really didn’t like that big open air gap under the front portion of the tank.
So I took advantage of the lockdown to change it. I had used a pair of “Projecta” HID lights from Furore products on my Transalp in Australia before. They are really good at illuminating the road, they are small, and thus not too obtrusive. But they aren’t cheap, about £300 a pair. However, they are E-marked and they have a mechanical shutter which gives them a dip and a main beam, so both lights are both permanently on. This means you can flick from dip to main without the 2 second delay that comes from having 1 light as dip and the other as main. Having properly functioning lights when riding country roads at night makes such a difference to how much I enjoy the ride.
A problem I have is that the instruments were designed to be behind a screen, so they don’t have a front, which both looks ugly and the clocks seem exposed to the weather. Therefore I need to incorporate a cover for them. The alternative is replace with a mini digi speedo but that’s £100+ and I’d just shelled out on the lights, and I had a bad experience with a shit rev counter on a digi speedo in the past. Standard clocks work so much better.
And I also didn’t want to follow existing survival bike styles: Which means I didn’t want to do twin 2CV headlights (My survival KLR650 had them 2 decades ago), and I didn’t want to do “bike with a face”, so no gasmask or alien face streetfighter fairing either. I did think about using an aftermarket katana fairing, but ultimately I decided it put too much bulk at the front, so that idea was rejected.
Pre-covid, to do design I used to load a photo of the bike into MS paint, I’d white out the parts to be removed, take home several prints, sharpen my pencils, and draw differing design options. Except I’m not in the office any more, I don’t have access to a printer. So I had to mock up in 3D, using old cereal packets.
The first thing I did was remove the forks entirely, so that I could weld a 10mm thick lug onto the headstock. This meant I could do away with that ugly fairing panel spar that I mentioned earlier. There is now an uninterrupted view of the full length of the fork legs.
I moved onto thinking about the lights, and how to set them up. I tried various different styles of headlight layout/instruments front cover.
Most of them looked a lot like an Africa Twin or Paris Dakar style.
I wanted the bike to look like it had been built in some improvised workshop after the mythical apocalypse, I didn’t want it to look like a standard bike, I want it to look home-made. So I kept thinking about how to style it. I’d been given a huge box of bike spares when a relative did a garage clearout, in it were a pair of LED marker lights, and thus the idea of multiple pairs of small headlights was spawned.
Much mocking up later, and I had a layout for the lights I was happy with. When creating a custom bike I find the “design” part the hardest. Making it look “right” is the hardest part for me. I can make things work, but the home made styling parts I make are often ugly. It seems to take me several goes at making the costmetic parts before I settle on a design which looks cool.
I’m working in a double garage in a suburban house. I have a workbench, a vice, a mig welder and grinders. I don’t have lathe or milling machine, but some mate shave lathes, so I can get some small turning jobs done. Most measuring and cutting is by eye, and by hand. The consequence of that is that parts I make don’t always have straight cuts, parallel lines, or proper right angles. This is OK when building a post-apocalyptic survival bike which I want to look like it was cobbled together in makeshift conditions. However, if I wanted to build a nice custom bike with beautifully machined components I think I’d struggle.
I’ve discovered “weld nuts” being sold by fasteners suppliers. Basically they are an unplated mild steel nut, designed to be welded to things. Which speeds up the process of creating a female thread or captive nut in a bracket, making it easier to bolt a component on.
With the design finally decided, my next task was making the brackets to mount the 3 sets of lights in the place I had mocked them up.
And HIDs come with a ballast pack, about the size of a cigarette packet, and I have 2 of them, the only place where I had space to mount those was under the front of the fuel tank. So I cut a sheet of 3mm thick alloy to act as a combined heatsink and mounting plate, and welded up brackets to locate that assembly under the tank.
Soon after completing that task I discovered the wires supplied with the lights didn’t meet. The path of least resistance was to buy more weatherseal connectors and their special crimping pliers, so I could adapt the HID’s original wiring. Whilst mucking about in that area I installed some dual-function white & yellow LED arrays to be sidelights/indicators visible to the side. I figure that if the bike is matt black it is invisible, these days car drivers are dazzled by the lights of their phone in their car, so you need to be bright to be seen. I decided to cover the bike in lights, it’ll be illuminated whilst riding after dark, so nobody can say they didn’t see me. The joy of modern LEDs is that they can be intensely bright whilst also being quite discreet when they’re not in use. I have learned that cheap Chinese LED lights off ebay are sh!t, they are too dim in daylight. Pay good money for American ones and they work much better, visible in both day and night. They are probably also made in China to be fair, just made to a higher spec.
At the front there are 3 pairs of lights, the biggest ones at the bottom are the HIDs.
Above that “the medium pair” are LED running lights which came from the box of bits, there’s no manufacturer’s mark on them. That’s a pity, cos they are brilliant, nicely discreet but are big enough and bright enough to be seen from quite a distance, but I cannot tell you how to search for them online. The top set of LEDS are 9watt eagle eyes with roughly 11mm diameter lens. These are also bright as feck. They are on a 10x1mm thread (metric fine) which I found out the hard way when trying to make tubes for them to screw inside. Once the lights were on I then narrowed the instruments by sawing off some superfluous plastic from their outer edges.
All that remained was to make some bodywork to cover the lights. I used polycarbonate sheet, mostly 2mm or 3mm thick. I bought off ebay, luckily I had plenty leftover stocks from the days before covid started and screens were needed everywhere. Polycarbonate is great stuff to work with. I found that acrylic (aka Perspex) is very brittle and shatters easily. Polycarbonate is easy to work, it can drilled, filed, angleground, and requires only gentle heating to bend it. They make conservatory roofs from polycarbonate. And they make bus shelters from it. So when chav kids throw a breeze block at the bus stop, the polycarbonate flexes, the block bounces off, and there’s no shattering. The sidepanels and tailpiece on The Scream are all made of polycarbonate which has since been pained black.
More cardboard templates later and I had made the panels.
You can’t bend the same piece too many times so some complex shapes were made by gluing 2 pre-bent pieces together. There was lots of filing out screw holes to be egg shaped in order to make them fit, but that’s how it will be after the apocalypse, man….Polycarbonate takes paint nicely so a simple spray and they’re done. Aldi spraypaint is shit, too much solvent and too little pigment, Screwfix and Toolstation sell much better stuff.
A separate task was to make the infill panels which fill the gap in front of the fuel tank. I’d bought some sheets of perforated aluminium with the best hole pattern. Again cardboard templates were used. Where it was cut and folded, the perforated alloy had vicious sharp edges, so I covered them in chemical metal to smooth them off. I also bought the narrowest available vehicle trim to cover the outer edges. Then I copied the rolling stones and painted it black.
I binned the top section of the front mudguard, leaving the lower cut away back section of the original one. That was great until it rained and I got a facefull of spray. As an interim measure I now have a standard mudguard on until I figure out a cool looking post apoc mudguard that also keeps the spray off my face.
The bike was back on the road a few weeks before the date of the re-scheduled Farmyard party at the end of September, so I could have ridden it there, though we all know that event was also a victim of covid. All this took 5 months, which is way longer than I had expected it to. It took a long time because I was going through the corona-coaster, some days were a deep struggle and some were totally brilliant. All of us have struggled as a result of the virus or the lockdown, for me it was the enforced solitude, without human contact I went a bit loopy at times.
It’s now October 2020, I’ve been riding the bike as often as I can, and so far the frosts still haven’t hit. My other bike (a Tiger 1050) is great at high speed on open roads with fast sweeping bends, but I have to ride an hour or so to get to them. The Scream is smaller, lighter, narrower, flickable. It’s great on the tight and narrow roads near my home, its slim enough to carve up city traffic, so this bike is great for a quick blast for a short time in my local area. Its great therapy.
I’m much happier with how it looks now, except for the front mudguard. It’s just a standard mudguard. I need something which can keep spray off my face, but I’d also like it to look a bit more aggressive. At the back of the bike I have a sliding mudguard extension which slides from under the number plate and is part hidden in the tailpiece. I’d like to have something similar at the front, which can be cool and minimal on dry days and on show days, but can also function as a mudguard needs to in wet conditions. If anybody’s got any ideas please share them.
For me to get from Edinburgh to the R&S or Road to Ruin its 8 hours of motorway riding. A few years ago I made a quickly removable luggage rack to carry my camping kit. I also made a removable larger front screen, which cut out the wind noise by about half, thus making long hours on the motorway a lot more bearable. That screen now won’t fit, so I’d like to make another. The lesson I learned from the first one was to buy a screen rather than making it, and instead devote my efforts to design and building a system of mounting brackets so it can be quickly fitted and removed. I’ve bought an aftermarket screen for an Africa Twin from ebay. This screen is taller and blacker than standard and doesn’t look out of place on this bike. When doing this latest round of work on the front end I thought ahead, and included some captive nuts in the work I have recently done, so there are mounting points for the necessary bracketry.
Winter’s tasks will be the screen, and the front mudguard. Other than that, the bike is the way that I want it to look. At last.
These are the most recent photos I have, the only thing to have changed since these were taken is the addition of a standard front mudguard
I am thinking of cutting some holes or slots in the front fairing panel, to break up the large area at the front. However, I am considering fitting some form of hidden dashcam behind that screen, with just a discreet hole for the lens to see through. Apparently cameras deigned for drones are the smallest ones so maybe I can get one of them to fit, and give it a switched live power feed. Another winter task methinks….
Big Chris- Posts : 280
Join date : 2017-07-26
Re: I spent 5 months of lockdown restyling the front end of my survival bike, here's what i did.
![]() by spotarama Mon Nov 02, 2020 2:13 am
by spotarama Mon Nov 02, 2020 2:13 am
looking good

spotarama- Posts : 172
Join date : 2017-07-26
Age : 59
Location : orstralier
Re: I spent 5 months of lockdown restyling the front end of my survival bike, here's what i did.
![]() by esox Mon Nov 02, 2020 9:21 pm
by esox Mon Nov 02, 2020 9:21 pm
Nah, don`t like it.
Can you put it back to standard as in the first pic.
Can you put it back to standard as in the first pic.

esox- Posts : 226
Join date : 2017-07-21
redfog likes this post
Re: I spent 5 months of lockdown restyling the front end of my survival bike, here's what i did.
![]() by voodoo Tue Nov 03, 2020 8:47 pm
by voodoo Tue Nov 03, 2020 8:47 pm
That is lockdown-time well spend! Good job.
voodoo- Posts : 264
Join date : 2017-07-04
Re: I spent 5 months of lockdown restyling the front end of my survival bike, here's what i did.
![]() by Sponsored content
by Sponsored content
Sponsored content
» I'm re-styling the front end of my survival bike. Help me weigh up my options....
» Please share survival bike styling ideas for a GSX1100G (but not VJ's bike)
» Media Whore!! and survival bike for sale
» My KLE survival bike project: sneak pics
» Ii spent 7 hours in`t garage today.
» Please share survival bike styling ideas for a GSX1100G (but not VJ's bike)
» Media Whore!! and survival bike for sale
» My KLE survival bike project: sneak pics
» Ii spent 7 hours in`t garage today.
Page 1 of 1
Permissions in this forum:
You cannot reply to topics in this forum|
|
|